12.18.2013

fresh from the Makery: DIY knock-off gingerbread train

We get an obscene number of catalogs this time of year. I bought a gift basket from Harry & David once, years ago, but continue to get catalogs from them several times a year. That kinda thing. In fact, I think West Elm is able to send you a catalog just by walking into their store. They must have some sort of invisible machine that scans your address on your person somehow - billing address from a credit card in your wallet maybe - and there is a catalog in your mailbox by the time you get home. And I enjoy looking through them. I remember as a kid, especially around the holidays, I'd look through catalogs and choose one thing I'd buy from each page if I could. One item from each page! I mean, obviously, I didn't actually get all those things but I think I continue to practice that form of "aspirational living" to some extent, browsing through catalogs from stores I rarely shop at.


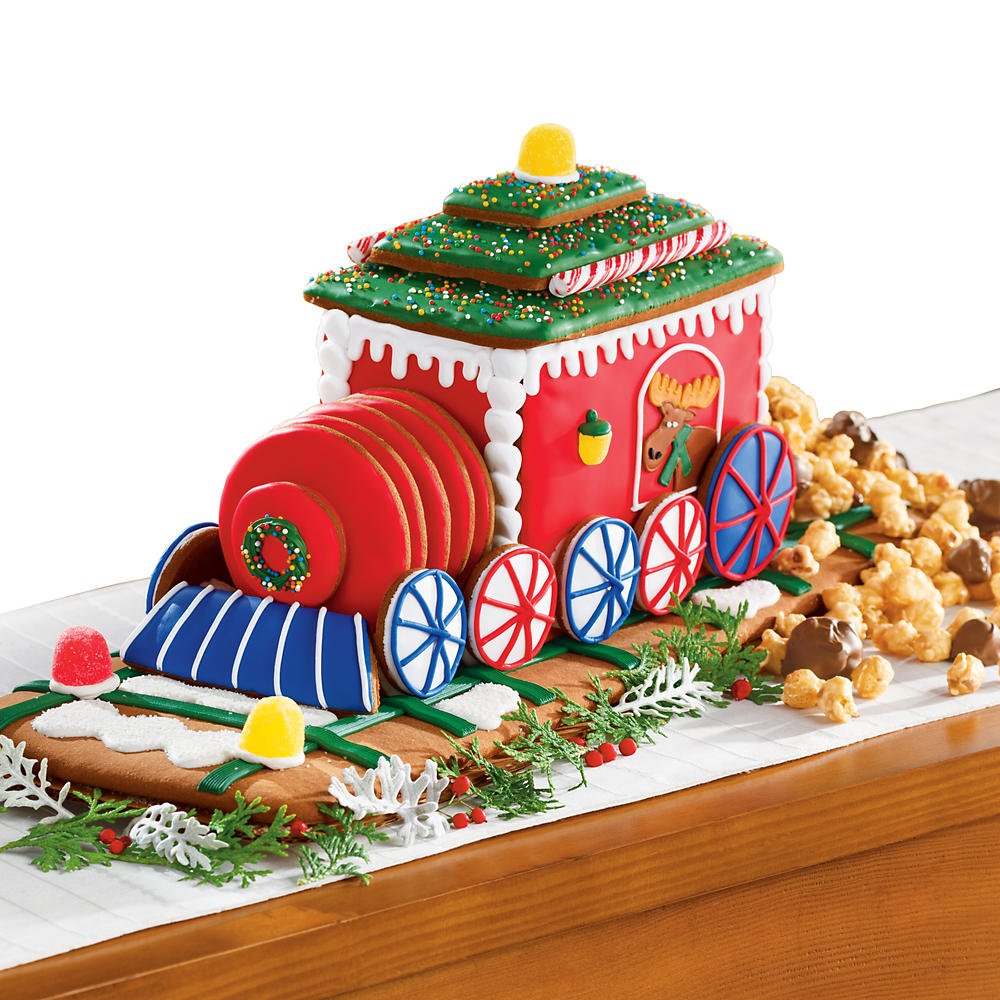
I spied this gingerbread train in the Harry & David catalog doing just that kind of thing a couple of weeks ago and I thought, in a temporary lapse of sanity, I could totally make that! With the 5 year old enlisted to help decorate! I've made gingerbread cookies before. I mean, really, how hard could it be?


Yep, nailed it! In our defense, it was actually the icing that flopped.


This was a first for me so I didn't really know what I should have been going for in terms of royal icing consistency. Now I know I probably need to increase the powdered sugar to egg yolk ratio and beat the mixture much longer.


That said, the runny icing worked fine for assembly, if a bit frustrating (and I think it would actually work pretty well to decorate the pieces separately before assembly). If I had to do it again, in addition to tweaking my royal icing recipe, I'd make sure to roll out the gingerbread a little thinner than 1/4 inch before cutting it. The thinner pieces were definitely a bit easier to work with.


Once I had it assembled, it only took a few extra minutes to set up enough to decorate it without imploding it.


I let the 5 year old do most of the decorating, helping him pipe out the runny icing and, when gravity worked against us in terms of adding decorations, we used some red and green candy melts instead.


But wait, there's more! Want to make your own DIY knock-off Harry & David inspired gingerbread train?  I thought so! Just click on the two images above and print each JPEG on 8 1/2 by 11 inch card stock, cut out the pieces, and use them as templates for your rolled gingerbread pieces.


I baked the pieces anywhere from 12 to 20 minutes (12 minutes for the smaller circles, and up to about 20 minutes for the larger pieces). I like weelicious' recipe for gingerbread cookies; there may be a different recipe out there better suited to gingerbread structures like this but the weelicious recipe worked just fine and I'm assuming it's pretty tasty even sitting out for a couple of days as parts of the train have started to slowly disappear.

Anyway, the project was fun to tackle with my son. Even though it didn't quite turn out as I imagined, he had a blast decorating it (consuming way too much sugar while he did so) and we're still brainstorming what we might make next year out of gingerbread. I think we might have started a new family holiday tradition.

PS - You can use the egg yolks and any leftover lemon juice from the royal icing recipe to make lemon curd (if you're feeling really ambitious you could even put it in little jars, slap a bow on it, and give it to someone local as a holiday gift!). I don't know about you but I like to use "the whole animal," so to speak.

12.04.2013

fresh from the Makery: flying hamburger, obviously

And specifically not a cheeseburger. Got it? That was what my 5 year old son wanted to make in response to his school's annual art show theme: up, up, and away! Also, it flies because it's a rocket ship, not because it has bird-like wings or something, in case you were wondering. Very specific. Anyway, we spent the better part of this past long, holiday weekend, when the baby was napping, bringing his vision to life and yeah, I'm now officially one of those moms who probably participates too heavily in the actual crafting of these kinds of things. But in my defense: a) I couldn't help myself (it felt so good to be crafty after almost 10 months of spending 99.9% of my time caring for an infant, schlepping around a kindergartener, and trying to run a household - the only thing I've added to that daily to do list in the last couple of months is exercise and even that has not happened as much as I'd like) and b) it wasn't like it was a graded science project or something. It's an optional art show that actually functions as a fundraiser for the school - art from local artists will be auctioned off during the show. The idea was fully his, he picked out almost all of the materials, and I made sure he at least helped a little with every part of the process. And I'm hoping this thing can go in his room as decoration after the show. Anyway, enough of the project's defense. Take a look:


I have a lot of crafty materials on hand, obviously, so our first step after Eli's initial sketch (which I'd post except we can't seem to find it!) was to collect materials we already had - felt, thread, pipe cleaner, and some stuff we ended up not using. We then went to a craft store to pick up some other items we knew we'd need (poly-fill, primarily) and window shop/brainstorm for anything else we might want to add (beads for the sesame seeds, half of a plastic ornament for the cockpit, white and brown pom poms for the milkshake rocket blasters, etc.). Again, Elias led the way on most of these items. It was hard not to jump in and say, for example, "these beads would make perfect sesame seeds!" but I did my best to resist (but the sesame seeds totally make the bun, don't you think?!). The 5 year old was truly the creative director on this endeavor.


Then we got to work crafting this flying hamburger rocket ship thing.


After getting started, I made a second trip to another craft store for something to use to make the actual hamburger patty (we ended up attaching brown felt strips to the perimeter of two one-inch thick Styrofoam circles glued together, ten inches in diameter - and yes, I did all of the hot glue gunning...I mean, c'mon) as well as a package of ten inch round cake circles for the underside of the buns and other components like the lettuce leaf wings and a slice of tomato. Those worked out really well and I was pleasantly surprised that gluing felt to Styrofoam worked so well (of course, we'll see how this thing holds up over time!). Elias cut out the tan felt circles and helped me sew on about half of the "sesame seed" beads. I handled the poly-fill and stapling part, attaching the felt circle to a cardboard round.


While I tweaked the lettuce leaf wings which he had cut out, Elias strung together the pom poms which would act as "exhaust" coming from the rocket blasters.


For the rocket blasters we used some small, clear blue plastic cups we had on hand, plus a portion of a red and white swirl pipe cleaner we found in my bin of random craft supplies for the straws.


There's one chocolate shake and one vanilla which are the flavors we actually get and share when we go to In 'n' Out - again, his choice. Personally, I would have gone with pink pom poms for a strawberry shake but, you know, it wasn't my project (see, exercising some restraint there).


Elias also wanted to incorporate some drawn elements, so he made a self-portrait for the cockpit and a couple of patches for the wings.


Not bad, eh? Here are a few more details:


Man, I could really go for a burger and shake now!