As I've mentioned before, since sending kid #2 to part-time daycare back in February, waiting in vain for custom orders to pick up (the "in vain" part I'll explain in a later post), I've been spending some of my 16 or so child-free hours each week catching up on projects around the house. We bought and moved into our little mid-century Oakland home almost exactly 4 years ago and it's taken us that long to even begin to finish some of the 70+ items on the to-do list we created after closing. We started updating the bathrooms almost two years ago; those are finally done. Well, you know, "done" for now. The kids' rooms I'd already painted and fussed with before kid #2's arrival. So all I have left to tackle is the combined living/dining area (we've rearranged the furniture in this not-so-great "great" room half-a-dozen times) and the kitchen, which needs a good spring cleaning, a fresh coat of paint, and, one day, a new refrigerator.

As a side-project of the kitchen plans, I've always wanted to transform this little built-in bookcase into a play kitchen, especially considering we're back in crazy toddler land with an 18 month old who would immediately destroy anything we put on those shelves (case in point: I've already had to fix or modify two elements in the play kitchen, finished just yesterday). Pre-fab play kitchens are expensive - okay, not that expensive, especially considering how much time I poured into this DIY version - and bulky, but mostly, I was smitten with the idea of creating a play kitchen that was built into an under-utilized portion of our real kitchen, daydreaming about an idyllic domestic scene that involves me cooking a real meal while both kids peacefully entertain themselves just feet away in their play kitchen ...Wait, where was I?
Ah yes, before and after. Do you suppose this "addition" increases our home value at all?? Not that we're planning on selling anytime soon, but really, who wouldn't want a built-in play kitchen? See idyllic domestic daydream, above. Anyway, does this post leave you with more questions than answers? Let's see if I can address a few of those now...

How long did this project take?
The "before" image above I originally posted to my Instagram account back in March or so. Those red IKEA coasters were part of the impetus for this project (they look just like stovetop burners, no?), but in the past six months, I've misplaced two of the four, so I was truly starting from scratch when I resumed this project last month. Inspiration and motivation combine with actual free time only occasionally, like a comet passing by Earth, but I've realized lately that I continue trouble-shooting a creative problem quite a bit in the long stretches of time between periods of actual productivity.

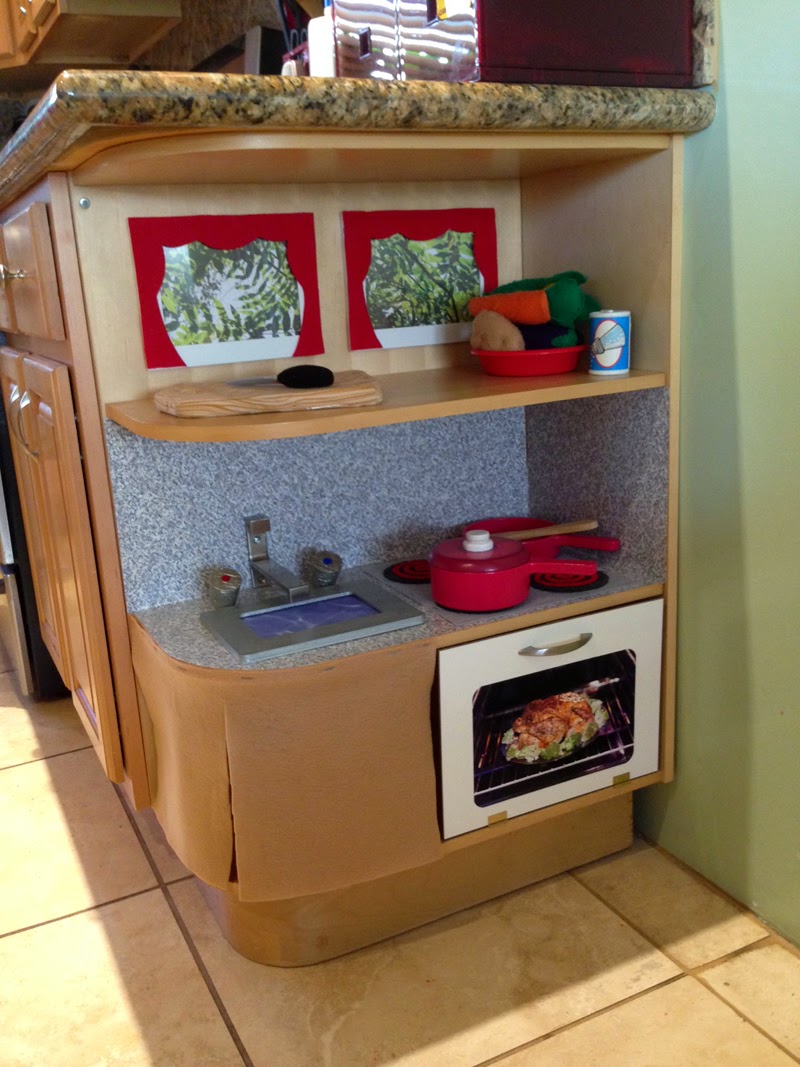
Is that a wall hook?
In addition, I get a lot of ideas from simply browsing different stores like Michael's (where I picked up the scrapbook papers above), Home Depot, IKEA (you say wall hook, I say super modern faucet), art supply stores, etc., a tactic which can prove time-consuming and expensive, however, if I'm not careful. But other than one round of returns, I did pretty well with this project both in terms of time spent shopping (notice how I specify time spent shopping, not time spent on the project in general) and overall cost.

How did you create a kitchen sink without making a huge hole in the shelf?
One of the biggest challenges was figuring out how to create a sink, for example, without any hardcore woodworking tools, like saws and stuff. I decided instead to paint a wooden picture frame with metallic silver paint, incorporate some of the water scrapbook paper mentioned above and call it a sink.
Whoa, is that real granite?
The "granite" counter and backsplash are made from contact paper I picked up at my local Ace Hardware store. Bonus feature - it's totally removable!

I'm curious about the sink fixtures, but can't remember what those hot and cold spinny-thingys are called...
Man, me neither! My original plan involved using a basic set of real bathroom fixtures but the cheapest set I could find was $25. When you consider spending $25 on one element of a DIY project, you really have to ask yourself if your project makes economical sense. Which is not to say this project does, but I was definitely not going to spend $25 on this part. Anyway, I found the wall hook at IKEA and love how that turned out. Even the 6 year-old got "faucet" right away. Success! But I wanted to take it one step further. I became obsessed with the idea of creating hot and cold handles (is that what they're called?) that could be rotated but not come off completely. So I spent a fair amount of time tinkering with a combination of dual threaded screws, t-nuts, and stop bolts recommended by the guy at Ace.

Unfortunately, I couldn't quite squeeze my drill in between the two shelves except at a slight angle and then the t-nut/screw/bolt combo wouldn't quite work right. So in the end, the hot/cold handles are cork painted with the same metallic silver paint used on the sink, with the dual threaded screw attaching those to the shelf (I had to drill a hole almost all the way through the cork to get most of the dual-threaded screw in then screw the portion of the screw sticking out of the cork into the angled holes I managed to drill into the shelf). We'll see how long it takes the kids to figure out that if they keep rotating the handles, they'll eventually come out all the way.

Tell me more about how you solved the problem of building a curved cabinet under the sink?
Since the shelves are curved, rather than drive myself crazy trying to build out some sort of rigid cabinet side and door, I simply stapled a large piece of tan felt, cutting a vertical slit at the corner for easy access to the under-sink storage area. (I've really gotten some mileage out of this tan felt, by the way, originally purchased in Boston for the cat carrier covers I threw together in 2009, before we moved back to California.)

Is that a chicken in the oven?!
It's a turkey! That part was easy. The oven door, not so much. I could've used a dozen different materials for this but decided on a prepped 9 x 12 inch clayboard at the art supply store - a decision motivated by the intersection of size and price with the option to paint on it. In the end, I printed a stock photo of a turkey roasting away and attached that to the front, used a leftover cabinet handle from our actual kitchen and bathroom, and a small set of hinges to attach the door to the bottom shelf. Initially I didn't want the hinges to show, but couldn't use the screws since they'd stick out of the relatively thin clayboard. So I tried three - yes, 3! - different kinds of glue. The kids broke the door off its hinges within 24 hours. So now the hinges show and I still need to find some sort of little stop bolts to cover up the little bit of the screw that pokes through the inside of the door.

How does the oven door stay shut?
With the power of magnets, my friends. And how powerful they are. The door stays closed thanks to a magnetic bracket thingy that is almost too powerful for the strength of the average toddler (you could say this play kitchen is ironically child-proofed in that way). My son can manage this no problem but my daughter occasionally has a hard time opening the oven. I'm thinking a thin piece of felt over the metal plate should help dull the magnet's pull just a bit. And if that takes me too long to finish, I figure the 18 month old will grow stronger over time, right?

What materials did you use to create the stovetop?
The stovetop is the last thing I tackled, which is ironic since it was the part I thought I had covered when I started this project. Now that half of my coaster/burners were missing, what should I use instead? When in doubt, I use felt!

I created four "burners" using charcoal gray felt, layered with three red, concentric circles and then hand-stitched all of those onto a lighter gray "stovetop" piece. The oven door is a bit wider than the stovetop since I attached the sink before the oven door, not quite leaving enough space to make the stovetop the same width. D'oh. Kids don't seem to mind this minor design flaw.

Why did you staple the stovetop onto the shelf/counter?
Partly because while I want this play kitchen to be built-in, I don't necessarily want it to be a huge hassle to eventually remove or modify (look for a post about a DIY play kitchen remodel in about a decade).

Microwave or view?
Finally, for the top shelf, I thought about trying to create a microwave in half of the space but instead went a slightly easier route and created windows using leafy green scrapbook paper I found at Michael's placed in white 5 x 7 inch frames from IKEA, finished off with very simple red felt curtains. I'm not 100% satisfied with the curtains and I'm guessing the 18 month old isn't either since that's the first thing she attempted to destroy upon arriving home yesterday afternoon. Alas, hot glue gun does not fix every crafty problem!

But wait, where's the fridge?
Ah yes, this is what the 6 year old asked when he saw the project in progress last week. I'm working on it, sheesh.